3 Nitty Gritty Tips About Independent Film Deliverables
Whether engaging in digital distribution via a distributor or on one’s own (DIY), the burden of producing deliverables is increasingly shifting onto filmmakers.
At TFC, when we speak of empowerment through education, we are often talking about the digital landscape as a whole. However, there is also a lot to be learned in the details. I’m sure every filmmaker can rattle off a list of annoyingly small screw-ups with deliverables and assets that ended up throwing multiple members of his or her team into a tizzy for an entire day, wasting precious time, manpower and financial resources.
Accordingly, arming yourself with a little more knowledge about how the industry works, and, in particular, how technology works, can help you dodge a few more bullets down the road. Here are 3 nitty gritty tips we’d like to pass on:
1) Trailers
It’s very easy to put your trailer up on YouTube or Vimeo these days. So easy in fact that filmmakers often forget that these platforms are anomalies when it comes to requirements for eligibility.
For other mainstream digital platforms, pretty much any time there is a digital storefront, whatever is outside of the pay wall needs to be viewable for all audiences: free of foul language, nudity, excessive violence, etc.
I can’t tell you the number of trailers we have seen with words like fuck and shit still in them…iTunes is not going to take a trailer with any language that needs to be bleeped out on television. Neither will it accept scenes with a butt shot, a sex toy, naked breasts…the list is long and can get murky real quick, and, like MPAA ratings, may be quite subjective and potentially unfair.
We totally get it…filmmakers want to be as provocative as possible, don’t like being inhibited, and want their trailers to represent as closely as possible the tone of their film. And they usually make their trailers long before they ever have to think about digital distribution. But if you don’t want to have to go back and recut your trailer down the road, you need to think about these things. If you want two versions of your trailer, that’s fine, but at least one one of them has to be no more than, let’s say, PG.
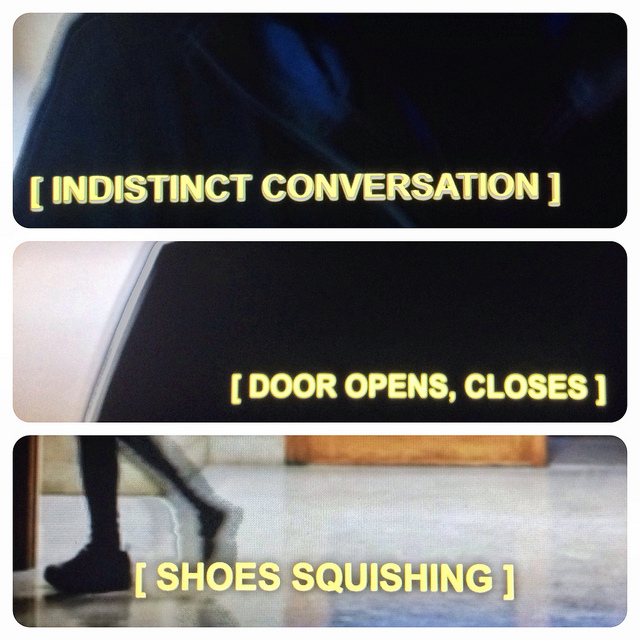
photo credit: CaptMikey9 via photopin cc
2) Closed Captioning and Subtitles
Many platforms, including iTunes and Netflix, now require that all new films be submitted with closed captioning for the hearing impaired. Closed captioning is different from subtitling in that it sometimes includes descriptions of non-speech elements, like sound effects or music. Captioning costs run from $350 to $800 per title.
Most filmmakers send their films out to a captioning/subtitling lab, or use rather expensive software to do it themselves (more information about these labs/software can be found on the ResourcePlace section of our website). Usually, filmmakers receive a small, emailable, external file from the lab and submit to their distributor/aggregator without giving it much additional thought.
However, we have seen a number of cases where mistakes have been made, which can result in a rejection of your content by the platforms and a delay in your scheduled release date. There are many closed captioning requirements, particularly regarding things like when captions come on and how long they stay on screen, and we have seen some problems in this area.
But by far the biggest cause of rejection is when closed captioning covers some of the lower thirds in the film. This is especially true in documentaries, where subjects are interviewed and their names appear as text graphics on screen. In those cases, the offending line of closed captioning must be moved (usually to the top of the screen).
There are two ways that these errors can be prevented. One is to go through your film and note the approximate time codes of all your lower thirds and ask your captioning lab to pay special attention to these areas.
The second way is to check the lab’s work before submitting to a distributor/aggregator. The most common file extension for closed captioning is .SCC (Scenarist Closed Caption). This is the file you are going to submit. However, it is not possible to view this file alongside your film in QuickTime or VLC. So you should ask your lab to convert it into a subtitle file and send that to you as well (this file would be solely for checking purposes…it shouldn’t be submitted to anyone).
The catch is that the most common form of subtitle file, .SRT (SubRip), does not hold placement, so while it is OK to ask for this file type merely for checking timing and accuracy of dialogue, you will not see any difference between lines that are on the bottom or those that have been moved to the top—they will all appear on the bottom. So the key is to ask for a different file format if you have dialogue spoken over lower thirds. Subtitle file types that hold placement are .STL (Spruce subtitle format) or iTunes Timed Text (iTT), a subset of TTML. For more on subtitling than you ever want to know, visit <a “href= http://en.wikipedia.org/wiki/Subtitle_(captioning) “>Wikipedia.
Lastly, speaking of subtitle files, we have seen many filmmakers obtain subtitle files from international film festivals (especially Spanish) and want to know if they can submit that as an extra to their North American release.
The answer is yes as long as it, like closed captioning, doesn’t cover up the lower thirds, and as long as your English master is textless (i.e. no burnt-in English subtitles). An important lesson here is that if your film has any lower thirds where dialogue is spoken over it, you will not be able to use .SRT files for any of your localized languages…use one of the other formats (.STL or .ITT).
So if someone produced an .SRT file for you, and you have lower thirds with dialogue spoken over them, you’ll need to get it converted and fixed before submitting to digital platforms.
Knowing exactly what you need will help you save time and get the best deal from your Subtitling Lab., because you will have pre-negotiated what you need in advance.
3) Digital Output
One of our members from Australia asked us about getting all of their lab deliverables taken care of at once so that they could qualify for The Producer Offset, which is a refundable tax offset (rebate) for producers of Australian feature films, television and other projects. While this credit may not apply to filmmakers who are not down under, I’d like to reiterate here what I told him: that producing deliverables too soon can cost you more in the long run.
If you produce a DCP or HDCAM, which can cost $2K or more, and approximately $350, respectively, before you sell your film, what happens when your distributor asks you to submit deliverables with their logo in front of it? You have to go back and do it again.
As far as DCP goes, until you are SURE that your film is playing at a top-notch festival, or that your film is even going to have a theatrical release, it may be best for you to wait, and only produce deliverables like ProRes, Blu-Ray and DVD in the short-term.
And by way of conclusion, speaking of DCP, TFC’s head of Festival Distribution, Jeffrey Winter, has offered a post on DCP headaches HERE.
David Averbach September 10th, 2014
Posted In: Digital Distribution, Distribution, DIY, iTunes, Netflix, Trailers
Tags: David Averbach, DCP, film subtitles, film trailers, independent film deliverables, independent film distribution, iTunes, Jeffrey Winter, MPAA ratings, Netflix